
 If you've opted for Image-Line's FL Studio 12 as your beginning DAW for beat generating, you then realize you have got quite a bit to master. As I've stated previously:
"FL Studio for novices is like placing a newborn baby into the Sahara Desert and expecting it to come back to society.''
Don't get nervous though - that's why I had written this website post: for novices to have a simple familiarity with Fruity Loops. The DAW is pretty large, and I also had to learn how to use the most of the various tools myself (personally don't know how to use every thing within yet, haha). But, once you get used to it and know what you are performing, you'll be setting fire to your house very quickly.
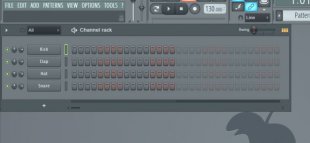
The Action Sequencer
The action Sequencer is basically for which you place your sounds in a specific place (I'll refer to them as blocks). It is acutely simple to use: Left-click to place the noise for the reason that block, correct mouse click to eliminate it from that block. You could have it put to as much places while you want, or otherwise not have sound truth be told there after all. Title regarding the sound from the left is named a channel (basically whatever sound you're utilizing). I think you'll stock up to 199 stations, but I extremely doubt during this period you need to use that lots of noises. If you are attempting to make a pattern, pay a visit to a bar in which it states "Pattern 1", and scroll down seriously to select a totally free one. Right-click the bar also it enables you to rename, delete, recolor, clone, and more choices.
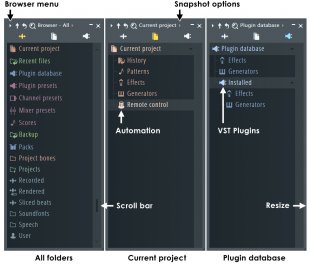 The Browser
The Browser may be the tool on remaining side of screen that allows you to load in almost any sound/VST you desire, or to stock up your FL Studio projects to carry on taking care of all of them. Here's how to use it if you're trying to find a kick, as an example:
- Click on through the selection of sounds until you've discovered the only you desire by left-clicking each sound to hear whatever they sound like (if you don't like most associated with noises offered, follow on the subcategory title inside folder as you performed to open up it, but simply to close it)
Note: If an audio is longer than 5 moments, the noise will stop. You must weight a sound into a channel to hear the whole thing
- Appropriate click the sound as soon as, you will see many choices. You are able to choose both to:
a) exchange that station's sound (the obstructs it's still filled in, volume meter, etc.)
b) open up a new station, including the sound in place of changing one with another
Once you have done loading your noise in, you can adjust its volume and panning (in which you hear a sound to the left or the right), and also figure out its place on the mixer.
 The Mixer
The mixer is very important in terms of making beats with FL Studio, it'll make everything alot more much easier to manage. That's where you add different effects (up to ten per noise!) to every channel. It is possible to adjust the amount, name, color, as well as other things as soon as you designate a channel to a free of charge mixer condition.
Here's a listing of controls you must know about:
Volume
- The grey knob you see on a mixer state when you initially start the mixer manages the quantity. Hold it and go up and down, with up increasing and down reducing the volume.
Measurements of Mixer States
- Choose whichever fits you most readily useful, there are several choices: lightweight, lightweight 2, Wide, large 2, Wide 3, and Extra big.
Impacts Slot Machines
- This is where you can add results through up to ten plugins by clicking a mixer state, visiting the far right of this mixer, and clicking the offered slots. The green key transforms the result on and off, additionally the knob regarding right of each and every slot controls its mix degree.
Naming and Coloring
- You'll (re)name your noises by right-clicking any mixer condition, and clicking the "Rename/Color option" will provide you with some club which allows you to definitely rename, color, and symbolize your mixer state. If you have a piano, you are able to rename your mixer condition to "Piano", shade it green, and also have the little keyboard sign represent the piano.
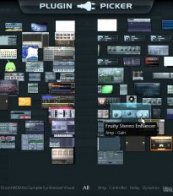
The Plugin Picker
This is how you can easily choose your plugins and load all of them to either your mixer or your action Sequencer. There's a lot of them, and they're pretty an easy task to start! Simply hold one, and pull it into a clear station, plus it should open up.
Share this Post
latest post
-
 Manual September 30, 2022
 -
 Handbook September 30, 2022
 -
 Guide September 30, 2022
 -
 Reference September 30, 2022
 -
 Links September 22, 2022
 -
 Sponsors September 22, 2022
 -
 Interesting September 22, 2022
 -
 We are supported September 12, 2022
 -
 Useful August 29, 2022